Understanding the essentials of how to place springs in a trampoline is very important, especially when it comes to safety and the overall effectiveness of the trampoline experience. Maintenance and repair of the trampoline involve the mat springs. Ordinarily, incorrect placement of springs will lead to improper stresses resulting in damages or injuries in some cases. In this guide, we will show you how to place trampoline springs in an effective and straightforward manner, regardless of whether the trampoline is circular or rectangular.
Step 1: Gather Your Materials
Before starting the process, make sure that you have everything you’ll need.
Trampoline Frame and Bed (Mat): Make sure your trampoline frame is properly constructed and fastened.
Trampoline Springs: Check and confirm that they aren’t worn out and are free of rust.
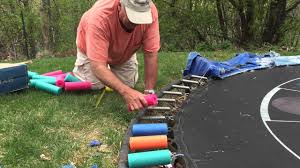
Spring Tool (Spring Puller): The majority of trampolines come equipped with a spring tool, however, if you do not have this type of tool you can purchase one separately. This tool assists in the installation of springs and enhances the safety of the installation process.
Safety Gloves: Use them to prevent cuts or blisters on your hands that may be caused by working with the springs.
If this is the first time you are installing or changing springs, it is advised to take a few seconds and learn how they operate. The spring hook is fastened to the frame of the trampoline as well as the bed making the mat tight such these will do. This creates the tension which will be essential for good bounces. If you are removing old springs to replace them with the new ones, make sure you check the maximum number of old springs and have them replaced with the new one if the old such appears over stretched or rusty.
Step 2: Commence Assembly from the Corners: (This Section is only For Use with Rectangular Trampolines)
When it comes to frame jumping devices, it is advisable to assemble the corners first. The most tension is applied to the springs located at the corners hence concentrating on them first will ease the load around the frame.
Here is the procedure in steps:
Connect the Spring to the Mat: The first step in securing springs is to attach them to the loops located on the trampoline mat’s surface.
There is a Spring Puller Tool: Use your spring tool to hold one end of the spring and draw it toward the frame.
Take Each Corner in Turn: When the first corner is secured, go to the next one which is the opposite of the first corner, then go on to the last two. This will give a steady platform for the attaching of the other springs.
Slight warping is acceptable. If you fasten the corners at the edges first, the chances of warp of the frame as well as stretching of the springs because of tension imbalance are minimized.
Step 3: Alternate Spring Placement (For Rounded Trampolines)
For round trampolines, a different technique should be applied. Instead of starting with corners, you’ll begin fixing springs at the ‘clock positions’ that is 12, 3, 6, and 9 o’clock. This method makes very equal distribution of tension throughout the entire trampoline.
Attaching the First Spring: The first spring is to be attached at the twelve o’clock position.
Opposite Side to be Occupied: After the first spring is attached, move up the trampoline and attach a spring at the six o’clock position.
Continue Alternating: Now, place springs at 3 and 9 o’clock positions. Repeat this alternating position long the entire circumference of the trampoline. Such procedures are done to avoid application of uneven tension which in turn prevents possible damage of the springs and the frame.
Step 4: Install the Remaining Springs
Once the corners (or clock positions) are done, it’s time to fill in the gaps with the remaining springs. Work in a star or zigzag pattern always instead of proceeding in a circular fashion. This is more effective in distributing the tension and therefore easier to fix each spring without too much trouble.
As for rectangular trampolines, when the corners are done, stretch the springs from the sides towards the center as well and work zigzag alternately until all springs are affixed.
For round trampolines, just follow the alternating pattern till all the springs are fixed.
Step 5: Verify the Tension
Once all the springs have been attached, a quick tension check will be carried out. Go around the trampoline checking the springs visually to ensure they are stretched evenly and are in position. You can press the mat down in different areas softly to check distribution of the pressure. If you feel that the mat or frame tension is relatively more in a certain portion as compared to others, you will have to take off some springs and re attach them evenly.
Any trampoline which has its springs in a moderate tension position means that a smooth and even bounce action will be served as best. The reasons for this is that uneven tension makes jumping or bouncing on the trampoline feel quite awkward, and worse, loose springs may become loose as well with time.
Step 6: Final Safety Inspection

After all the above work, it’s best to be sure one last time that everything is safe to operate before one or more of the users will be allowed to start jumping on the trampoline:
Look for Gaps: There should be no spaces between the springs and the frame to avoid pinching and spring accidents. Take note that these springs are properly attached.
Look for Damage or Loss: Inspect the mat, springs, as well as the frame for any damages or worn out items. Determine if any part requires replacement.
Confirm the Net is fastened: For instance, if your trampoline has a net it, make sure it is appropriately attached to the frame.
Common Mistakes and How to Avoid Them
Despite the fact that attaching the springs of the trampoline is a very easy undertaking, it can have some setback due to some common mistakes:
Skipping the Star Pattern: Some people want to try sewing the springs clockwise or anti clock wise as opposed to alternation. This can cause severity in stresses and entail much difficulty in the job. Always perform this action moving towards the other sides until each side with spring is finished attaching the spring.
When Not Using a Spring Puller: Attaching springs doesn’t require any tool per se. But for the sake of ease and safety, a spring puller should be utilized. Don’t even think about skipping this step – your hands will pay the price!
Attaching Worn Out Springs: Usage of old, rusted or stretched springs will not be beneficial for your trampoline as it will not provide the much-needed tension. So, every spring is worth observing before attaching it and those which show signs of wear out should never be used.
Caring for Your Springs
The trampoline springs have to bear injurious stresses due to jumping, weather or even time. Regular trampoline maintenance is what must be adhered to if you want your trampoline to be in the best form possible.
Routine Cleaning: springs could get dirt build up slowly due to handlers’ neglect after a period of time, which results into loss of elasticity. Use a moist towel to wipe them after about three months.
Reduce Rust: if you are living in humid and rainy areas, the springs are susceptible to rust. For this reason, it is advisable to make use of rust inhibiting spray on the springs once every one or two years especially for outdoor trampoline owners.
Renew Damaged Springs: As time goes by, springs can stretch, loose tension or even vomit due to pressure. If after some time you realize that your trampoline doesn’t have that jump, then it might be time checked for broken springs. With a few replacement springs in store, you will be able to save time and keep your trampoline in good condition.
Treatment During the Winter: For people who live in regions where winter entails very low temperatures, you might consider taking apart your trampoline and storing it away until summer. Springs may become unstable due to extreme cold weather and snow, resulting in fracture.
When to Replace Springs
Spring replacement is determined by a variety of factors such as trampoline usage frequency, weather conditions, and spring type. For heavily used trampolines, inspect the springs every 6 months for any signs of surface wear, particularly stretching or rust. Where the trunk is used less frequently, once a year inspection can be done.
Conclusion: The Essential Advice Means Getting the Most Perfect Bounce
Correct placement and adjustment of the springs is vital in safeguarding a fun bouncing experience. This means that whether you are installing new trampoline springs or replacing the old ones it’s advisable to use a stepwise, alternating technique as this helps in even tensioning the mat and hence increasing its durability.