
Disassembling a Spring-free trampoline may seem daunting, but it is important to do it properly to ensure its safety and longevity. Whether moving it to a new location, storing it for the winter, or making repairs, taking apart a Springfree trampoline requires preparation, patience, and attention to detail.
This guide will provide you with a step-by-step process for safely and correctly disassembling a Springfree trampoline.
We will cover all the necessary materials, tools, and safety considerations for each process step, including removing the mat, net, springs, legs, frame, and FlexiNet rods.
By following this guide, you can easily disassemble your Springfree trampoline and ensure it is ready for storage, repair, or relocation.
How to disassemble a springfree trampoline: To disassemble a Springfree trampoline, start by clearing the area, gathering tools, and following safety considerations. Then, remove the mat, net, springs, legs, frame, and FlexiNet rods. Finally, clean and store the disassembled parts for future use.
How to Disassemble a SpringFree Trampoline? Step-by-Step Guide
Disassembling a Springfree trampoline requires preparation, patience, and attention to detail. Here is a step-by-step guide on how to disassemble a Springfree trampoline safely and correctly:
Preparation
Preparing to disassemble a Springfree trampoline requires attention to safety, clearing the area around the trampoline, and gathering the necessary tools and equipment. Here’s a closer look at each of these important steps.
Safety Considerations:
Safety should be a top priority when preparing to disassemble a Springfree trampoline. It’s important to have at least two adults working together during the disassembly process to help ensure safety and avoid accidents.
Before beginning, read and fully understand the manufacturer’s instructions for disassembly. You should also wear protective gear, such as gloves and safety goggles, to avoid any injury or discomfort.
When working with a trampoline, avoiding jumping or playing on it is important, as this could cause unnecessary wear and tear on the mat or frame. Additionally, make sure that children or pets are kept away from the area during disassembly.
Clearing the Area Around the Trampoline:
Clearing the area around the trampoline is another important step to ensure safety during disassembly. This means removing any obstacles or objects that may be in the way or could cause a tripping hazard.
Start by clearing the ground area around the trampoline. Remove any toys, chairs, or other items in the way. Next, move any nearby furniture or other large objects that could obstruct the disassembly process.
It’s also important to ensure enough space to lay out the disassembled parts of the trampoline. This will help prevent parts from becoming lost or damaged during disassembly.
Gathering Tools and Equipment:
The disassembly process will require specific tools and equipment, so it’s important to have everything on hand before starting.
Some of the tools and equipment that you will need may include:
- Spring puller tool
- Socket set
- Screwdrivers
- Pliers
- Rubber mallet
- Allen wrenches
- Wire cutters
- Safety gloves and goggles
- Check the manufacturer’s instructions for a comprehensive list of tools needed for your Springfree trampoline model.
Once you have all of the necessary tools and equipment, organize them in a way that makes them easily accessible. This can help save time and prevent the loss of any tools during the disassembly process.
Removing the Mat and Net
Removing the mat and net is one of the most important steps in disassembling a Springfree trampoline.
Here’s a step-by-step guide on how to remove the mat and net safely and efficiently:
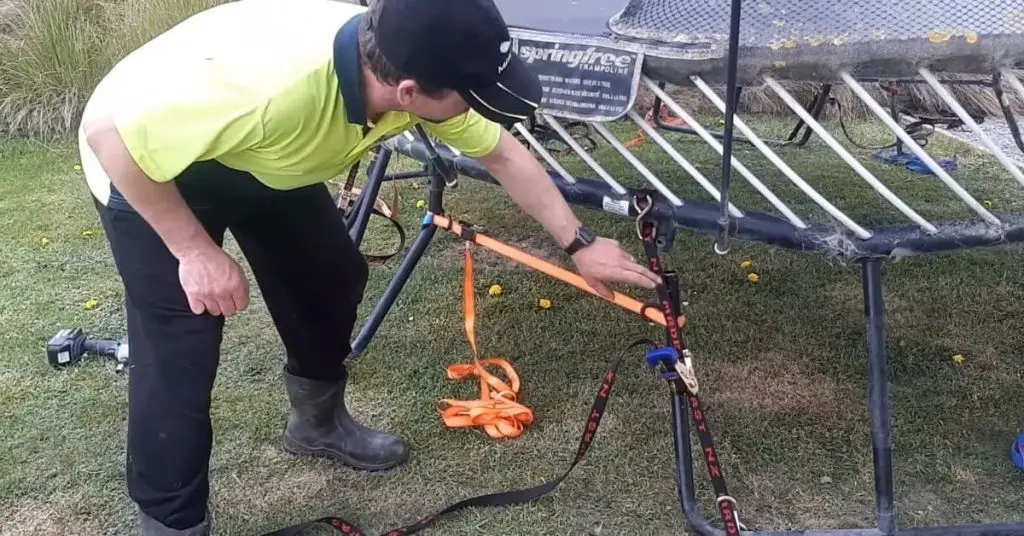
Loosening the Net from the Frame:
The first step in removing the mat and net is to loosen the net from the frame. Start by locating the net clips that attach the net to the frame. These clips are usually located at the bottom of the frame.
Use pliers to gently pry the clips open and release the net from the frame. Once you’ve loosened all of the clips, the net should be free from the frame and hanging loosely.
Removing the Net Rods:
The next step is to remove the net rods. These long, flexible rods run through the top of the net, keeping it in place. To remove them, simply press the button on the rod and slide it out of the top of the net.
Make sure to keep the net rods organized as you remove them, so they can be easily reassembled later. You can use zip ties or a piece of string to keep them together.
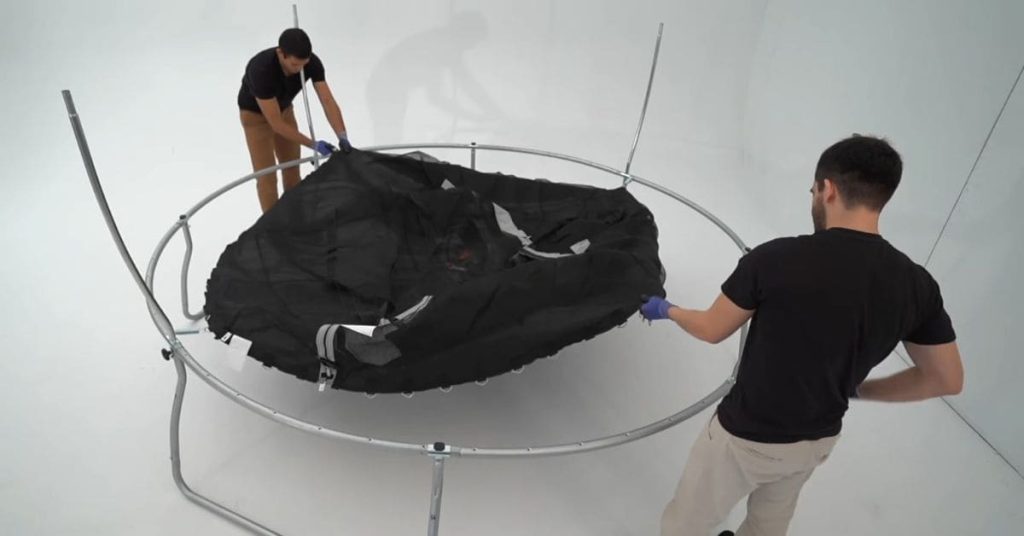
Taking Off the Mat:
Once the net is removed, it’s time to remove the mat. Begin by removing the spring hooks from the mat. These are the metal hooks that attach the mat to the frame.
Use a spring puller tool to carefully remove the springs from the frame. Start at one end of the trampoline and work around, removing each spring. It’s important to keep track of the springs as you remove them, so they can be reassembled in the correct order.
Once all the springs have been removed, carefully lift the mat off the frame. Be sure to keep the mat flat and supported to avoid any damage.
Disassembling the Frame:
The final step in removing the mat and net is disassembling the frame. This step will vary depending on the specific model of your Springfree trampoline, so be sure to refer to the manufacturer’s instructions for guidance.
Generally, disassembling the frame involves removing the bolts that hold the frame together. Use a socket set or Allen wrench to loosen and remove the bolts.
Once all of the bolts have been removed, carefully disassemble the frame. Keep the parts organized and stored in a safe place, so they can be easily reassembled later.
Removing the Springs
Once you have removed the mat and net of your Springfree trampoline, the next step is to remove the springs. This step is essential for dismantling the trampoline frame and storing it away.
Here’s a step-by-step guide on how to safely and efficiently remove the springs:
Identifying the Location of the Springs:
The first step is to identify the location of the springs. You should have already removed the net and mat, allowing you to easily locate the springs.
The springs are attached to the frame at regular intervals, and each spring hooks onto a specific hole in the mat. Take note of the position of the springs and keep them organized as you remove them to ensure they are reassembled correctly.
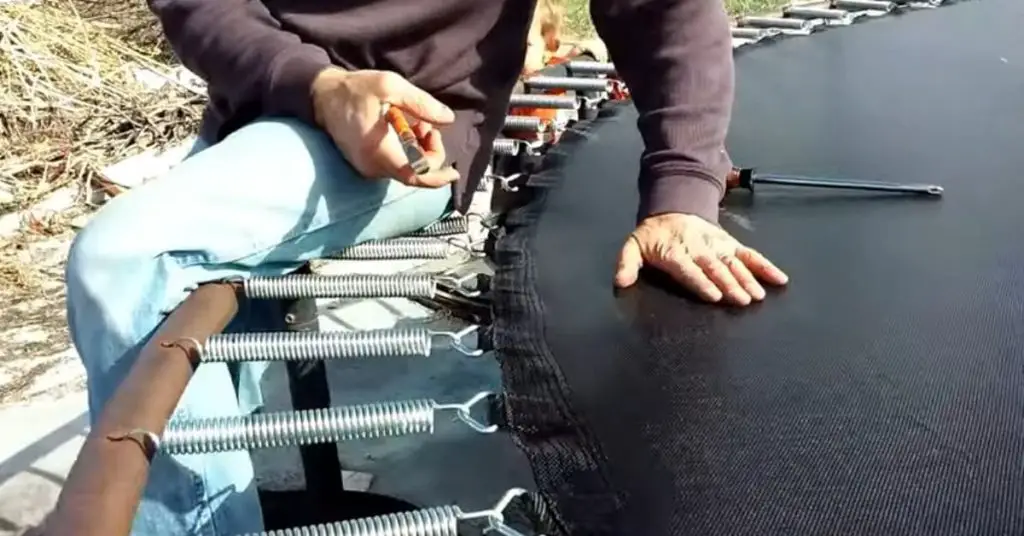
Using a Spring Puller Tool to Remove the Springs:
The next step is to use a spring puller tool to remove the springs. A spring puller is a specialized tool designed to make removing springs easier and safer.
To use the spring puller, hook one end onto the spring and the other end onto the frame. Press down on the tool’s handle to stretch the spring and remove it from the frame.
Repeat this process for each spring, working around the trampoline until all springs have been removed.
Removing the Spring Hooks from the Mat:
Once you have removed all the springs, the final step is removing the spring hooks from the mat. These are the metal hooks that attach the mat to the frame.
Use a spring puller tool to carefully remove the hooks from the mat. Start at one end of the trampoline and work around removing each hook.
Be sure to keep the hooks organized as you remove them, so they can be reassembled in the correct order. You can use zip ties or a piece of string to keep them together.
Tips for Removing Springs:
Here are some tips to make the process of removing springs easier and safer:
Use a Spring Puller Tool: A spring puller tool will make removing springs much easier and safer. It will also help to prevent injuries and damage to the trampoline.
Wear Protective Gear: Wear protective gloves and goggles to protect your hands and eyes from potential injuries.
Work in Pairs: It’s always best to work with a partner when removing springs. This will make the process faster and safer, and it will also help to prevent injuries.
Keep the Springs Organized: Keep the springs organized as you remove them, so they can be easily reassembled later. You can use zip ties or a piece of string to keep them together.
Dismantling the Legs and Frame
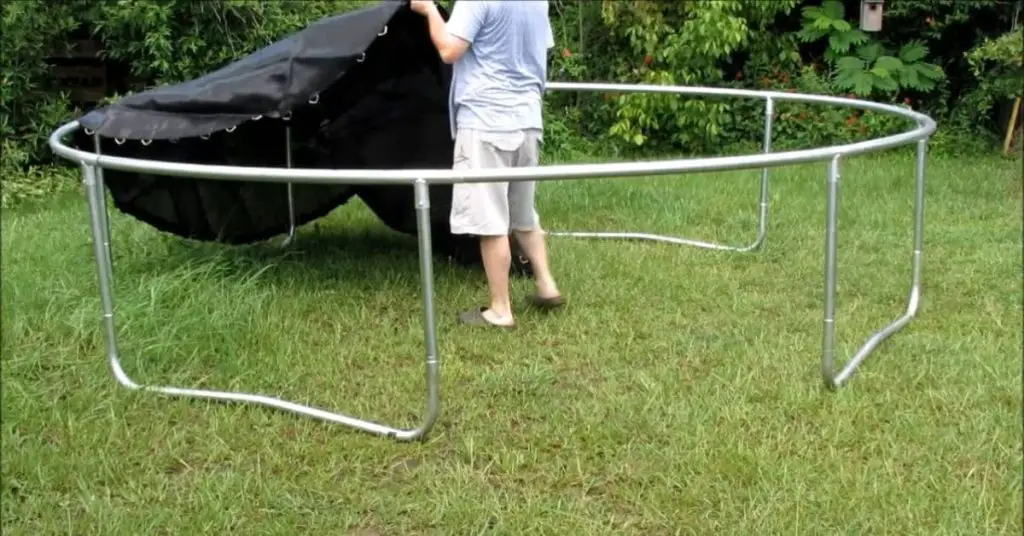
The final step in disassembling a Springfree trampoline is dismantling the legs and frame. This can be done in a few simple steps.
Removing the Legs from the Frame:
Start by removing the legs from the frame. Each leg is attached to the frame with a bolt and nut. Use a wrench to loosen the nut and remove the bolt.
Once the bolt is removed, the leg can be lifted off the frame. Repeat this process for each leg.
Taking Apart the Frame:
Next, the frame needs to be taken apart. The frame comprises multiple sections that are held together with bolts and nuts.
Remove the bolts and nuts that hold the frame sections together using a wrench. Once all bolts and nuts have been removed, the frame sections can be separated and stored separately.
Disassembling the FlexiNet Rods:
The FlexiNet rods are the curved rods that hold the net in place. These rods can be easily removed from the trampoline.
Start by removing the bolts and nuts that hold the rods in place. Once the bolts and nuts have been removed, the FlexiNet rods can be lifted off the frame.
Store the rods and hardware separately to avoid getting lost or damaged.
Tips for Dismantling the Legs and Frame:
Here are some tips to make the process of dismantling the legs and frame easier and safer:
Label the Frame Sections: Label each frame section as you take it apart to make it easier to reassemble later.
Keep the Hardware Organized: Keep the bolts, nuts, and other hardware organized as you take them apart. Use plastic bags or small containers to store them.
Use a Second Person: It’s always best to work with a partner when dismantling the legs and frame. This will make the process faster and safer, and it will also help to prevent injuries.
Follow the Manual: Follow the manufacturer’s instructions when dismantling the trampoline. This will ensure you don’t damage parts or void the warranty.
Store and Organize Parts
Storing and Organizing Your Trampoline Parts (Trampolining Pro Tips):
- Find a Safe and Dry Spot: Just like landing a perfect flip, your trampoline parts need a safe place to land. Find a spot that’s dry and secure, like a garage or shed. Make sure it’s clean and free from any potential hazards, just like a flawless landing zone.
- Label and Organize: Imagine your trampoline parts are like your favorite trampoline tricks – they need names and order. Label or group them to make it crystal clear what’s what when it’s time to put it back together. You don’t want to mix up springs with frame pieces; it’s like mixing up your front flips with your backflips!
- Small Parts, Big Ideas: Those tiny nuts and bolts might seem insignificant, but they’re like the tiny adjustments that make a jump perfect. Store them in a labeled container, like a treasure chest for trampoline builders. This way, you won’t be searching for a missing screw when it’s time to bounce again.
Remember, just like nailing a trampoline routine, taking your time and being organized will ensure a smooth disassembly and reassembly process. Happy bouncing!
Cleaning and Storage
After disassembling a Springfree trampoline, it’s important to clean and store the various components properly to ensure they remain in good condition and are ready for reassembly when needed.
Cleaning the Various Components of the Trampoline:
Start by cleaning the mat and net. Use a soft-bristled brush or a cloth to remove dirt, debris, or leaves. If the mat or net is especially dirty, use mild detergent and warm water to clean them. Rinse the mat and net thoroughly with a hose and let them air dry before storing them.
Next, clean the frame, legs, and hardware. Use a soft cloth or brush to remove any dirt or debris. If the hardware is rusted, you can use a rust remover to clean it. Be sure to dry all the components thoroughly before storing them.
Properly Storing the Disassembled Parts:

When storing the disassembled parts, it’s important to keep them clean and dry. Store the mat and net separately from the frame and legs to prevent damage.
The best way to store the frame and legs is to keep them in a dry, cool place such as a garage or shed.
If possible, store the parts in a way that minimizes their exposure to moisture, dust, and pests. You can use a tarp or plastic cover to protect the parts from moisture and dust.
Store the hardware separately in a small container or plastic bag to prevent it from getting lost. Label the container or bag with the part’s name and location to make it easier to find them when it’s time to reassemble the trampoline.
Preparing for Reassembly:
Before reassembling the trampoline, inspect all parts to ensure they are in good condition. Replace any damaged or worn-out parts to ensure the trampoline is safe.
Consult the manufacturer’s instructions for reassembly and follow them carefully to ensure the trampoline is assembled correctly. Use the proper tools and hardware to secure the parts in place.
When reassembling the trampoline, start with the frame and legs, then attach the FlexiNet rods, mat, and springs. Finally, attach the net to the frame and test the trampoline to ensure it’s safe and secure.
Tips for Cleaning and Storage:
Here are some tips to make the process of cleaning and storing the Springfree trampoline easier and more efficient:
Store the Parts Properly: Store the disassembled parts in a dry, cool place protected from moisture and pests.
Label the Parts: Label the parts to make it easier to find them when it’s time to reassemble the trampoline.
Inspect the Parts: Inspect the parts before storing them and replace any damaged or worn-out parts.
Use the Proper Tools and Hardware: When reassembling the trampoline, use the proper tools and hardware to ensure it’s safe and secure.
Consult the Manufacturer’s Instructions: Follow the manufacturer’s instructions carefully to ensure the trampoline is assembled correctly.
FAQs
Q.1 Why do I need to disassemble my Springfree trampoline?
You may need to disassemble your Springfree trampoline for several reasons, including moving to a new home, storing it away for the winter, or making repairs.
Q.2 What tools do I need to disassemble a Springfree trampoline?
You will need a spring puller tool, pliers, a rubber mallet, a socket wrench, a ladder, and a Phillips head screwdriver.
Q.3 How long does it take to disassemble a Springfree trampoline?
The time it takes to disassemble a Springfree trampoline depends on various factors, such as the size of the trampoline, the number of people helping it, and the complexity of the disassembly process. Generally, it may take a few hours to disassemble a Springfree trampoline.
Q.4 Can I reuse the same parts to reassemble my Springfree trampoline?
Yes, you can reuse the same parts to reassemble your Springfree trampoline if they are still in good condition. However, inspecting all parts before reassembly is recommended to ensure they are in good working order.
Q.5 How should I store the disassembled parts of my Springfree trampoline?
A: You should store the disassembled parts of your Springfree trampoline in a dry and safe place, away from moisture, dust, and direct sunlight. Labeling each part and storing them in separate containers or bags for easy identification and organization is recommended.
Q.6 Do I need special skills or experience to disassemble a Springfree trampoline?
No, you do not need any special skills or experience to disassemble a Springfree trampoline. However, it is important to follow the instructions provided in this guide and to take your time during the disassembly process.
Q.7 Is it safe to disassemble a Springfree trampoline myself?
Yes, it is safe to disassemble a Springfree trampoline if you follow the safety considerations and instructions in this guide.
Conclusion
In conclusion, disassembling a Springfree trampoline can be accomplished by following a step-by-step guide. The process involves careful preparation, ensuring safety considerations are in place, and gathering the necessary tools and equipment.
The first steps involve removing the mat and net by loosening the net from the frame, removing the net rods, and removing the mat. Afterward, the frame can be disassembled by removing the springs using a spring puller tool and detaching the spring hooks from the mat.
The legs and frame can then be dismantled by removing them from the frame and taking apart the frame. Additionally, the FlexiNet rods can be disassembled. Once disassembled, cleaning each trampoline component and properly storing them to maintain their condition is important.
Proper preparation for reassembly is also essential. Following these steps and tips for cleaning and storage will help ensure a successful disassembly of the Springfree trampoline.
After reading this complete guide on disassembling a Springfree trampoline, we hope you will understand it well. If you have any questions, please feel free to ask by leaving a comment below!