Disassembling a trampoline is generally more straightforward and quicker than assembling it. Taking apart a trampoline has certain advantages, such as extending its lifespan. Therefore, understanding how to disassemble a trampoline properly is vital for any user.
While many services offer professional assistance with this task, it can quickly be done as a DIY project. Here we will provide detailed instructions on how to disassemble a trampoline. Disassembling a trampoline can be time-consuming and potentially dangerous, so it’s important to take the proper precautions.
A Comprehensive Guide to Trampoline Disassembly.
Sometimes it’s necessary to take apart your trampoline – otherwise, there’s a risk of damage to the equipment. Breaking down the trampoline is straightforward and only requires a few essential tools.
What is the purpose of disassembling a trampoline?
The most common reason people take apart their trampoline is to transport it. This can be necessary when moving house or sending the trampoline away for repairs. Disassembling also ensures that all parts are safely stored and kept dry – which prevents rust and corrosion from forming.
If you live in an area with a mild climate or tropical region, it is not necessary to disassemble your trampoline. All you need to do is provide the essential maintenance and care for the trampoline.
On the other hand, if you are located in an area with harsh weather, such as extreme cold temperatures or heavy snow, it is essential to disassemble and winterize the trampoline to extend its lifespan. This process prevents your trampoline from blowing out during upcoming storms or hurricanes.
Moreover, cold and damp weather can easily cause rust on the frame and springs that may eventually degrade them over time. Likewise, a warm summer climate can be detrimental to the trampoline as it can break down faster.
For this reason, taking apart the trampoline and storing it indoors can help prevent both these situations from occurring and make it safe to use while enhancing its aesthetics.
Toolkits and preparations.

- Spring puller
- Electric drill
- Phillips head screwdriver or 10mm spanner
- Gloves
Preparing the area where you intend to store trampoline parts is essential before starting the dismantling process. Remember to clean out any dirt and debris from the trampoline itself, as well as from any accompanying containers.
You should have received a few tools and accessories necessary for this task with your purchase. If you’re missing any of them, purchasing replacements before beginning is best.
It’s also helpful to read the manual that comes with your trampoline and follow all instructions carefully. Lastly, do not attempt this task alone; enlist the help of a partner or friend to ensure safety and accuracy.
Spring puller
A trampoline puller is handy for installing or taking apart a trampoline. Its design allows it to attach to the trampoline springs while remaining secure quickly. You’ll start by removing the protective caps placed on each spring.
You can do this by simply twisting them off or using a screwdriver to pry them off. Once the caps are removed, place the spring puller on top of each spring. The puller should be securely fastened using its two screws on either side.
Hand Gloves
Gloves should be worn when disassembling a trampoline, as metal frames and springs can cause serious injuries if not handled properly. Double-coated working gloves most effectively protect potential wounds, dirt, and other contaminants.
Wearing gloves keeps you safe and helps make the process quicker and more comfortable. It is essential to take safety precautions seriously when carrying out a trampoline disassembly, so remember to put on your gloves before beginning the task!
They also save you time in the long run by reducing the risk of unnecessary repairs or replacements caused by careless handling.
Electric drill
If you own a power drill, it can be advantageous in disassembling a trampoline as it can easily unscrew the bolts and nuts on the trampoline frame and support posts. Start by removing the protective coverings from each spring (as previously described).
Next, use a Phillips head screwdriver or 10mm spanner to remove the screws and nuts that hold together the frame. After this is done, use the drill to unscrew the bolts from each spring and support post.
Now is the time to Removing The Ladder and Net.
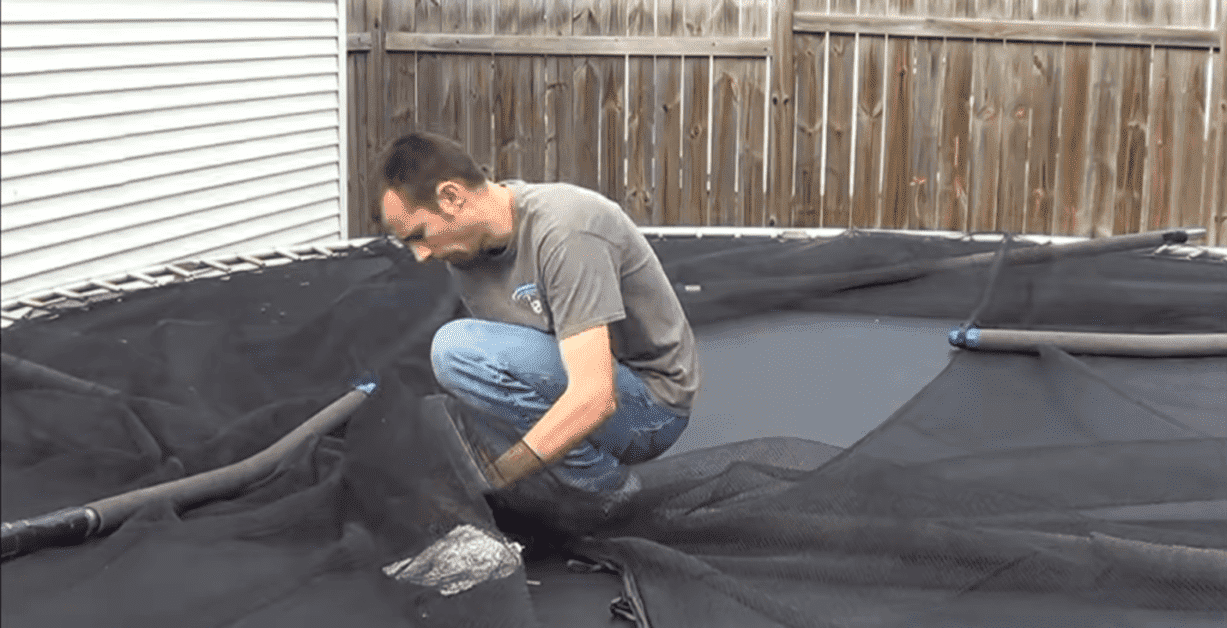
Remove the net, ladder, and additional accessories, such as tents and clubhouses, to dismantle a trampoline. Please start with the tent and clubhouse before tackling the other components for added safety. Unfasten each pole attached to the frame and lay them on the trampoline before untying any net held at the bottom.
Once all poles are released, neatly fold and box up the net for storage. Protect each pole with wrapping tape and store the ladder in its box, wiping away any rust or debris beforehand using a non-toxic water-based remover specially selected for this purpose. Assemble your trampoline into smaller parts that can easily store away following these steps.
This simple process ensures that your trampoline can be quickly disassembled and kept in prime condition for future use.
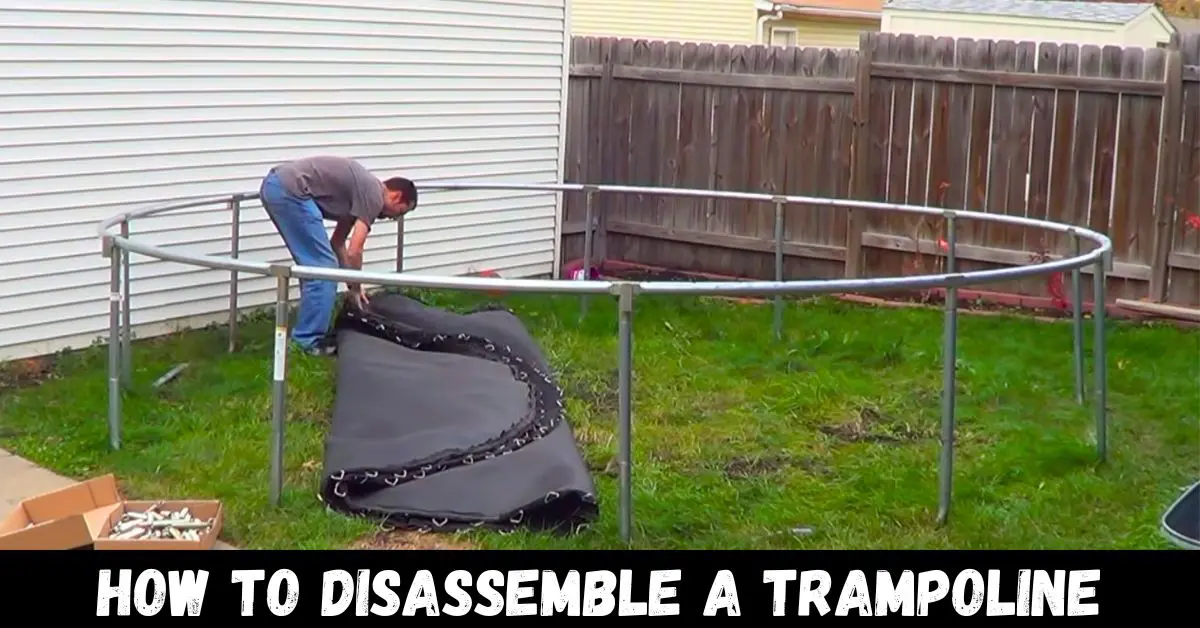
Remove the safety cover.
Detach the trampoline’s protective pad’s binding beneath the bounceable surface. If any damages or irregularities are observed, mark them for further repair with duct tape. Removing the single-piece safety pad before or after taking apart the netting is possible.
A key may come in handy to loosen up the ties if the knots are too tight. Gently fold the pad and store it in its initial container when you’re done. This will ensure the pad stays safe for reuse in the future.
Here is an overview of the spring disassembly process.
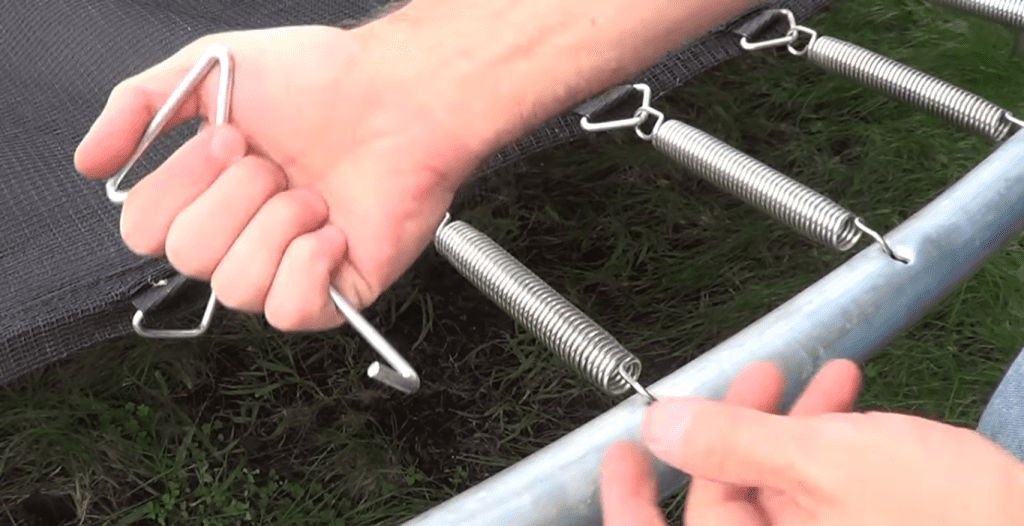
Trampoline springs can be difficult to remove, but they can be done quickly with the right approach. Start by taking your spring tool and picking any spring you want to remove. Then pull the hook from the mat end towards the center of the trampoline until it’s fully extended.
Before detaching this hook from its frame connection, carefully loosen up the V-ring on the mat. Repeat these steps for all other springs on your trampoline. If you need a quicker solution, try using an open-end spring instead of a puller, as it allows you to detach springs in one motion simply by pulling its hook toward you.
Alternatives such as pliers, screwdrivers, and caulking guns are viable options for removing trampoline springs. Once all the springs are taken off, store them in a box for safekeeping. The springs can be kept organized and safe for later use by tying them with strings or clothespins. Take care not to pull too hard since the springs are metal and could easily break under heavy pressure.
If you purchased a trampoline with special clips, use a flathead screwdriver to remove each one. If the springs have caps, slowly and carefully twist them off with your hands.
Now you have to fold the mat.
The mat is the last remaining element to disassemble. To properly store it in its designated box, begin by folding it into four sections and then tying each side with rope for extra security. Make sure not to leave any creases on the mat, as this could make assembly more difficult later.
If you need additional assistance, use a hand-held vacuum to help remove any remaining dirt or debris. Finally, store the mat in its box and keep it away from sunlight, as prolonged exposure to UV rays can damage the material.
Conclusion
Despite how daunting it may seem, disassembling a trampoline is relatively easy when you have the proper preparation and a systematic approach. Start by removing the protective cover, then remove the net, ladder, and other accessories.
Proceed until you reach the springs and detach each one using specialized tools or a flathead screwdriver. Finally, fold the mat into four sections and store it away for future use. Following these instructions will ensure that your trampoline is safely taken apart and stored in a way that makes reassembling easy when needed.
So this was my guide on how to disassemble a trampoline. This article was helpful and gave you a good overview of the process!
FAQs
Below I am showing some common questions related to disassembling a trampoline.
How long does it take to disassemble a trampoline?
It typically takes around an hour to 2 hours to disassemble a trampoline. This time can vary depending on the size of the trampoline and how complicated the setup is.
Can you move a trampoline without taking it apart?
Installing trampoline wheels is a convenient way to transport a trampoline without additional stress. Replacing standard legs with these specialized wheels can be quickly and easily done, offering an effortless transition from one location to another.
Do I need special tools to remove the trampoline springs?
Specialized spring removal tools are suggested for this task, as they provide support and safety when detaching each spring. Alternatives, such as pliers and screwdrivers, can also be used if you don’t have these tools.