Trampolines provide endless fun and exhilaration for both children and adults alike. However, as with any equipment, regular maintenance is essential to ensure optimal performance and safety.
When it comes to trampoline springs, proper measurement is key to maintaining the bounce and overall functionality of the trampoline.
Whether you’re replacing worn-out springs or simply curious about their specifications, knowing how to measure trampoline springs accurately is vital.
This article will explore the step-by-step process of measuring trampoline springs, allowing you to confidently assess their length and gauge their condition.
We will cover the necessary tools, measurement techniques, and important considerations to ensure your trampoline springs are in perfect shape.
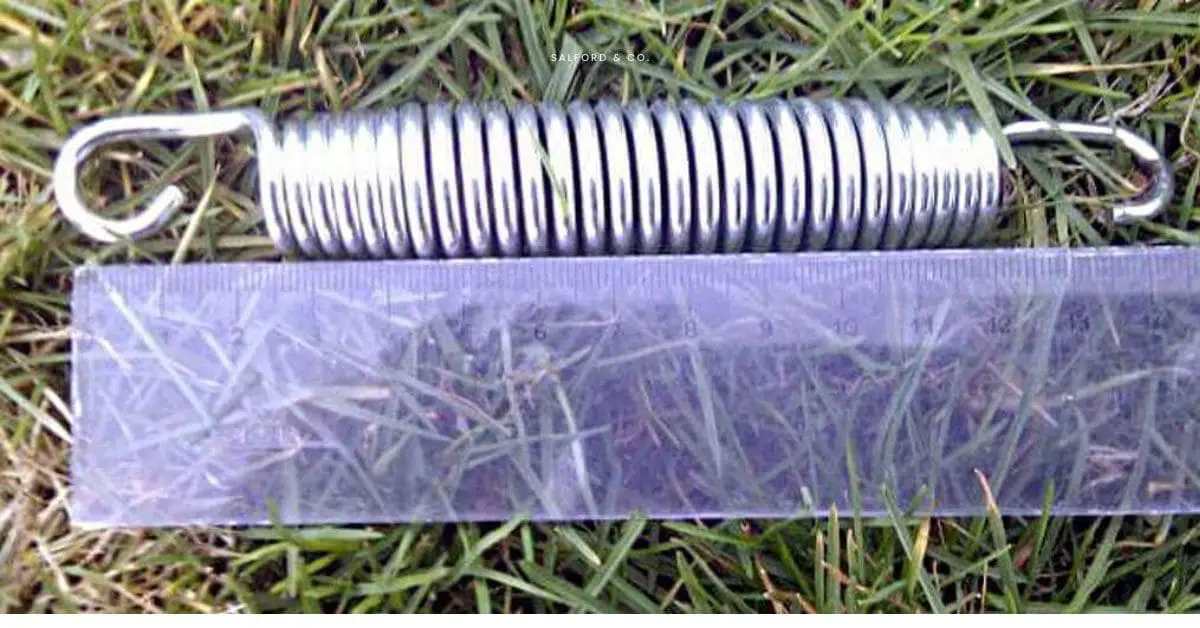
How to measure a trampoline spring: To measure a trampoline spring, use a tape measure to determine its length from one end to the other, including hooks. Measure when the spring is fully stretched for accuracy.
Preparing for Spring Measurement
Spring measurement is an important task for maintaining and repairing trampolines. Accurate measurements ensure that the springs are in good condition and that the trampoline provides a safe and enjoyable experience.
Before embarking on spring measurement, following certain safety precautions, gathering the necessary tools and materials, and learning how to remove the springs safely is essential. In this article, we will discuss each of these aspects in detail.
Safety precautions before measuring trampoline springs
Safety should always be the top priority when working with trampolines. Before starting the spring measurement process, take the following precautions:
Wear protective gear: Put on gloves and safety glasses to protect your hands and eyes from potential injuries. Trampoline springs can be under tension and may snap or release abruptly, causing harm.
Inspect the trampoline: Check for any signs of damage or wear, such as bent frames, torn jumping mats, or rusty springs. If you notice any issues, address them before proceeding with the measurement.
Clear the area: Ensure the surrounding area is free from any obstacles or hazards. Remove toys, furniture, or any other objects that may obstruct your movement while working on the trampoline.
Work with a partner: Having a partner assist you during the process is advisable. They can help stabilize the trampoline and provide extra hands if needed.
Tools and materials needed for accurate measurements
To obtain precise measurements, gather the following tools and materials:
Tape measure: A flexible tape measure will allow you to accurately measure the length of the trampoline springs. Ensure that it is long enough to span the spring’s length when fully extended.
Pen and paper: Keep a pen and paper handy to record the measurements as you go along. This will help you keep track of each spring’s length.
Safety pins or zip ties: These can be used to secure the springs in place while you measure them. This prevents the springs from snapping back or slipping out of position.
Removing the springs from the trampoline safely
When removing the springs for measurement, follow these steps:
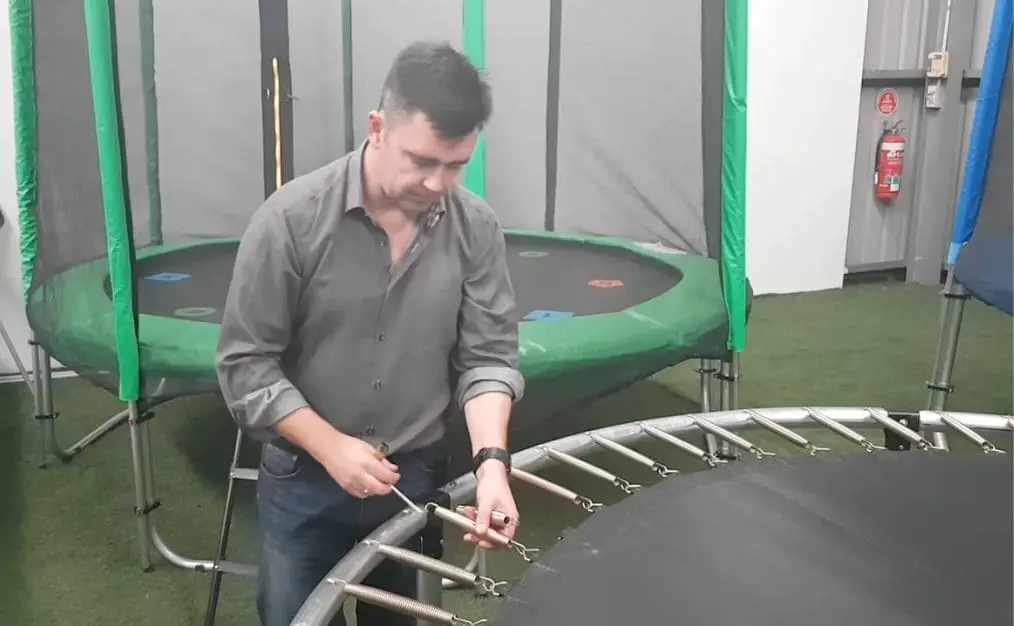
Start at one end: Choose a starting point along the trampoline’s frame. Position yourself beside the trampoline and locate a spring near you.
Secure the spring: Use a safety pin or zip tie to secure the spring to the frame. This will prevent it from recoiling when you remove it.
Remove the spring: With it secured, carefully detach it from the frame by pulling it away. Be cautious and maintain a firm grip to prevent any accidents.
Measure the spring: Once the spring is removed, extend it fully and use the tape measure to measure its length. Record the measurement for future reference.
Repeat the process: Move along the trampoline’s frame and repeat the steps to remove and measure each spring until you have assessed all of them.
By following these guidelines, you can ensure a safe and accurate measurement of your trampoline springs. Regularly measuring and maintaining the springs will help prolong their lifespan and ensure the overall safety of the trampoline.
Measuring Trampoline Springs

Trampoline springs play a vital role in the performance and safety of a trampoline. Over time, these springs may lose their elasticity and weaken, resulting in a less bouncy and less safe trampoline.
To ensure that the springs are in good condition and provide a safe experience, it is important to measure them regularly.
we will discuss the key components of trampoline springs and provide step-by-step instructions for measuring them accurately.
Understanding the key components of a trampoline spring
Trampoline springs comprise three main components: the coiled central portion, the hooks at each end, and the metal wire used to create the spring.
The coiled central portion is part of the spring that is compressed and stretched during use, and it is the portion that needs to be measured to determine the length of the spring.
The hooks at each end of the spring are used to attach the spring to the trampoline frame and the jumping mat. The hooks are typically bent at a 90-degree angle and should be straightened before measuring the spring.
The metal wire used to create the spring should be made of a high-quality, rust-resistant material to ensure the longevity of the spring.
How to measure a trampoline spring? Step-by-step
There are different methods for measuring trampoline springs, but we will cover the two most common ones. These methods are easy to follow and require minimal tools.
Method 1: Measuring the entire spring length
This method involves measuring the spring’s entire length, including the coiled central portion and the hooks at each end.
Step 1: Straighten the hooks
Before measuring the spring, it is important to straighten the hooks at each end. Use pliers to bend them back into a straight line, so they are parallel. This will ensure that the spring is correctly positioned and that the measurement is accurate.
Step 2: Measure the coiled central portion
To measure the coiled central portion, extend the spring as much as possible until fully stretched out. Use a measuring tape to measure the length of the coiled central portion from the end of one hook to the end of the other hook. This will give you the length of the spring, including the hooks.
Explanation of how to measure the coiled central portion
Measuring the coiled central portion can be tricky, as it is compressed and difficult to straighten out. To get an accurate measurement, it is important to extend the spring as much as possible.
You can do this by gripping the hooks with pliers and pulling them in opposite directions until the spring is fully extended. Use a measuring tape to measure the length of the coiled central portion without including the hooks.
Tips for accurate measurements
To ensure accurate measurements, follow these tips:
- Use a flexible measuring tape: A flexible measuring tape will allow you to accurately measure the coiled central portion, even when it is compressed.
- Measure multiple springs: To accurately represent the trampoline’s overall condition, measure multiple springs and calculate the average length.
- Measure springs when not in use: Springs can stretch and contract depending on temperature and usage. To get the most accurate measurement, measure the springs when they are not in use and at room temperature.
Method 2: Measuring the stretched length
In addition to the method discussed earlier, another common approach to measuring trampoline springs is by measuring their stretched length. This method provides a different perspective on the spring’s elasticity and allows for a more accurate assessment.
Here, we will outline the proper technique for stretching the spring and provide guidance on measuring the stretched length accurately.
Proper technique for stretching the spring
Step 1: Choose a suitable location
Find an open area where you have enough space to stretch the spring without any obstructions. It’s best to perform this task outdoors or in a spacious indoor area.
Step 2: Secure one end of the spring
Securely grip one end of the spring’s hook using a pair of pliers. You can hold it directly or attach it to a sturdy object such as a fence or a handlebar. Ensure that it is firmly held in place.
Step 3: Stretch the spring
With one end of the spring secured, pull the other away from the fixed point. Apply gradual and steady force to stretch the spring to its maximum extent. Take care to maintain control and avoid any sudden releases of tension.
Measuring the stretched length accurately

Step 1: Position yourself correctly
Stand at a distance from the stretched spring, allowing you to measure its length comfortably and accurately. Maintain a clear line of sight along the extended spring for precise measurements.
Step 2: Measure the stretched length
Using a flexible measuring tape, measure the distance from the end of one hook to the end of the other hook. Ensure that the tape is taut and parallel to the extended spring.
Step 3: Repeat for multiple springs
To understand your trampoline’s spring condition comprehensively, repeat this process for each spring. Measure multiple springs and record their stretched lengths to assess consistency across the trampoline.
Tips for accurate measurements:
Use a flexible measuring tape: A flexible tape measure allows for precise measurements, especially when dealing with the extended length of the spring.
Take average measurements: Measuring multiple springs and calculating the average stretched length provides a more accurate representation of the overall condition of the springs.
Be mindful of safety: While stretching the spring, exercise caution to prevent any accidents. Ensure you have a secure grip on the spring and maintain control throughout the process.
Measure when the trampoline is not in use: To obtain accurate measurements, measuring the springs when the trampoline is not in use is recommended. This minimizes any potential tension or distortion caused by weight or movement on the trampoline.
Method 3: Calculating the average length
In addition to measuring individual springs, calculating the average length of the trampoline springs provides a comprehensive overview of their overall condition. This method is particularly useful when dealing with many springs or seeking a general assessment of the trampoline’s spring system.
Here, we will discuss the advantages and considerations of this method, along with a step-by-step process for calculating the average length.
Advantages and considerations of using this method
Advantages of calculating the average length:
Comprehensive assessment: By calculating the average length, you can evaluate the overall condition of the trampoline springs instead of focusing on individual measurements. This provides a more holistic perspective on the spring system’s performance.
Efficiency: Measuring each spring individually can be time-consuming, especially for trampolines with numerous springs. Calculating the average length saves time and effort while still providing valuable information.
Considerations when using this method:
Variations in spring length: Trampoline springs can naturally have slight variations in length due to manufacturing processes or wear and tear. Calculating the average length helps account for these variations and provides a more representative measurement.
Influence of external factors: It’s important to note that external factors such as temperature, humidity, and usage can affect the length of trampoline springs. These factors can cause springs to expand or contract, resulting in measurement variations.
To mitigate this, measuring the springs under consistent conditions, such as when the trampoline is not in use and at a stable room temperature, is advisable.
Step-by-step process for calculating the average length
Step 1: Gather the necessary tools
Before starting the process, ensure that you have a flexible measuring tape and a notebook or recording device to keep track of your measurements.
Step 2: Select a representative sample
Choose a representative sample of springs from different areas of the trampoline. This ensures that you capture a range of spring lengths across the entire trampoline surface. Aim for a manageable sample size yet provide a fair representation of the overall spring system.
Step 3: Measure each spring in the sample
Using the methods described earlier (measuring the entire spring length or measuring the stretched length), measure each spring in your sample. Record the length of each spring as you go.
Step 4: Calculate the total length
Add up the lengths of all the measured springs in your sample. This will give you the total length of the sampled springs.
Step 5: Determine the number of measured springs
Count the number of springs you measured to determine the sample size.
Step 6: Calculate the average length
Divide the total length of the measured springs (from Step 4) by the number of measured springs (from Step 5). This will give you the average length of the sampled springs.
Step 7: Assess the average length
Compare the average length to the manufacturer’s specifications or any recommended guidelines for the trampoline. This will help you evaluate the condition of the springs and determine if any adjustments or replacements are necessary.
Step 8: Repeat the process if desired
If you have a large trampoline or want a more accurate assessment, you can repeat the process with additional samples from different areas of the trampoline. Calculate the average length for each sample and then calculate the overall average based on all the samples.
By following this step-by-step process, you can calculate the average length of your trampoline springs, providing valuable information about the overall condition of the spring system.
Regularly calculating the average length allows you to monitor changes over time and take appropriate maintenance measures to ensure the safety and performance of your trampoline.
Tips and Troubleshooting

Common Challenges in Measuring Trampoline Springs, Tips for Handling Different Types of Springs, and Troubleshooting Measurement Issues
Common Challenges Encountered During Spring Measurement
When measuring trampoline springs, you may come across certain common challenges. These challenges can make the process more difficult, but you can overcome them with some tips and tricks. Here are a few common challenges and how to tackle them:
Tension and Stretch: Trampoline springs are designed to stretch and provide a bounce. This tension can make it tricky to accurately measure their length. You can use a spring puller tool specifically designed for trampoline springs to overcome this challenge.
This tool helps to extend the spring while you measure it, making the process easier.
Coil Shape: Trampoline springs have a coiled shape, making it difficult to determine the exact starting and ending points for measurement. To address this challenge, straighten the spring as much as possible before measuring.
This will give you a more accurate measurement of the uncompressed length.
Rust and Corrosion: Over time, trampoline springs may develop rust and corrosion, affecting their performance and measurement accuracy. If you encounter rusty springs, clean them thoroughly before measuring.
Use a wire brush or sandpaper to remove any rust or debris, ensuring a more precise measurement.
Tips for Handling Various Types of Trampoline Springs
Trampoline springs come in different types, such as heavy-duty, galvanized, or tapered springs. Each type requires specific handling techniques to ensure accurate measurements. Here are some tips for handling different types of trampoline springs:
Heavy-Duty Springs: These springs are typically thicker and stronger, providing enhanced durability and bounce. When measuring heavy-duty springs, use a sturdy measuring tape or ruler capable of handling their size and weight. This will help you achieve accurate measurements.
Galvanized Springs: Galvanized springs have a protective coating to resist rust and corrosion. When measuring galvanized springs, avoid damaging the coating, as it can affect their performance. Gently handle the springs and avoid using sharp or abrasive tools during measurement.
Tapered Springs: Tapered springs have a unique design with varying coil diameters. When measuring tapered springs, measure from the widest point of the coil. This will ensure that you capture the maximum length of the spring accurately.
Troubleshooting Solutions for Measurement Difficulties
You may encounter measurement difficulties while measuring trampoline springs despite your best efforts. Here are some troubleshooting solutions to help you overcome these challenges:
Inconsistent Measurements: If you notice inconsistent measurements, double-check your measuring technique. Ensure that you hold the measuring tool straight and perpendicular to the spring. Avoid any bending or curving of the tape or ruler, as it can lead to inaccurate readings.
Difficulty in Determining Length: If you find it challenging to determine the exact length of the spring due to its spiral shape, use a straight object, such as a wooden dowel or a straightened wire hanger, to help you measure.
Hold the straight object against the spring to align with the uncompressed length, then measure the object.
Spring Loss or Damage: If you encounter a missing or damaged spring, replacing it with a new one is crucial. Ensure that the replacement spring matches the specifications of the original, including length, thickness, and type.
Keeping all springs in good condition will help maintain the trampoline’s safety and performance.
Remember, accurate spring measurements are essential for maintaining the safety and functionality of your trampoline. By following these tips and troubleshooting solutions, you’ll be better equipped to handle challenges and achieve precise measurements for your trampoline springs.
Utilizing the Measured Spring Data
Accurate measurement of trampoline springs is essential for various reasons, including replacement, sourcing new springs, and ensuring compatibility and safety.
This guide will explore how to effectively utilize the measured spring data.
We will discuss interpreting the measured spring length for replacement, sourcing replacement springs based on the measurements, and ensuring compatibility and safety with new springs.
By following these guidelines, you can ensure your trampoline’s optimal performance and longevity.
Interpreting the measured spring length for replacement
When measuring trampoline springs, the length is a crucial parameter determining their effectiveness. It is essential to accurately interpret the measured spring length to make informed decisions about replacements. To do this:
Compare measurements to the original specifications: Refer to the trampoline’s user manual or manufacturer’s guidelines to determine the recommended spring length for your specific model. Compare the measured length with the original specifications to identify any deviations.
Check for stretched or worn-out springs: Trampoline springs may stretch or wear out over time, affecting their performance. If the measured length of a spring is significantly longer than the original specifications, it may indicate stretching. Consider replacing such springs to maintain optimal bounce.
Consider the impact of tension: The tension of trampoline springs affects their performance. Higher tension provides a stronger bounce, while lower tension may result in a softer bounce.
Take note of the tension of the original springs and compare it with the measurements. Adjusting the tension of the replacement springs can help replicate the desired bounce experience.
Sourcing replacement springs based on the measurements
Once you have measured your trampoline springs, finding suitable replacements that match the measurements is important. Here are some tips for sourcing the right springs:
Consult the manufacturer or retailer: Contact the trampoline manufacturer or a trusted retailer to inquire about replacement springs. Provide them with the measured length and other relevant details to ensure an accurate match.
Consider the type of springs: Trampoline springs come in various types, such as coil springs or heavy-duty springs. Determine the type of springs your trampoline requires based on the original specifications and choose replacements accordingly.
Verify the coil count and wire gauge: Besides length, other parameters like coil count and wire gauge can impact the performance and compatibility of replacement springs.
These details are often available in the trampoline’s documentation. Ensure the replacement springs match the original coil count and wire gauge specifications.
Ensuring compatibility and safety with new springs

When installing new springs on your trampoline, ensuring compatibility and safety is crucial to prevent any accidents or injuries. Here are some tips to keep in mind:
Consult the manufacturer or a reputable retailer: Before purchasing new springs, consult the trampoline manufacturer or a reputable retailer specializing in trampoline parts. Provide them with the measurements of your old springs and any other relevant details about your trampoline.
They will be able to guide you in selecting the appropriate replacement springs that match the measurements and meet the requirements of your trampoline model.
Inspect the trampoline before installation: Thoroughly inspect the trampoline for any signs of damage or wear, including the frame, mat, and other components.
If you notice any issues, address them and repair them before replacing the springs. This will help maintain the structural integrity of the trampoline and prevent any potential accidents.
Replace all the springs simultaneously: It is recommended to replace all the springs simultaneously to maintain even tension distribution and consistent bounce across the trampoline surface.
Replacing only a few springs risks creating an imbalance and uneven bounce, which can affect the trampoline’s performance and pose safety hazards.
Follow the manufacturer’s instructions: Follow the manufacturer’s instructions carefully when installing the replacement springs. Pay attention to the correct orientation and positioning of the springs to ensure a secure fit.
Improper installation can lead to instability and an increased risk of accidents. If you are uncertain about the installation process, seek professional assistance to ensure it is done correctly.
Conduct thorough testing: After installing the new springs, conduct thorough testing to evaluate the bounce and stability of the trampoline. Check if the tension is consistent across all springs and if the bounce is uniform across the entire surface.
If you notice any issues, such as uneven tension or an unstable bounce, make the necessary adjustments to achieve the desired performance.
Regular maintenance and inspections: Regular maintenance and inspections are essential for the long-term health of your trampoline and its springs. Periodically inspect the springs for signs of wear, such as corrosion or deformation, and replace them if necessary.
Perform routine maintenance tasks, such as lubricating the springs, as recommended by the manufacturer. This will help prolong the lifespan of the springs and ensure optimal performance.
Following these tips ensures compatibility and safety with new springs and keeps your trampoline in excellent condition. Remember to prioritize safety and regular maintenance to ensure many safe and enjoyable bouncing hours for you and your family.
How to measure a trampoline spring size
To measure a trampoline spring size, follow these steps:
- Remove a spring from the trampoline: Begin by removing a spring from the trampoline. This will allow you to measure it accurately.
- Measure the length: Using a tape measure, measure the length of the spring from end to end. Start from one hook or loop end and extend the tape measure along the curved body of the spring until you reach the opposite end. Ensure that the tape measure is straight and not stretched to get an accurate measurement.
- Note the measurement: Record the measured spring length in inches or centimeters. Make a note of it for future reference.
- Measure the coil count: The coil count refers to the number of coils or turns the spring has. Count the number of full coils or turns on the spring to measure the coil count. Start from one end and count all the complete rotations until you reach the other end.
- Verify the wire gauge: The wire gauge refers to the thickness of the spring wire. A numerical value usually denotes it. To determine the wire gauge, you can use a wire gauge measurement tool or consult the trampoline’s documentation or manufacturer for information on the wire gauge used in the springs.
- Repeat for other springs: Repeat the measurement process for each spring you wish to measure. It’s important to measure multiple springs to ensure consistency and accuracy.
By following these steps, you can effectively measure the size of your trampoline springs. The measured length, coil count, and wire gauge will help you find suitable replacement springs or adjust your trampoline as needed.
How to measure a trampoline spring cover
To measure a trampoline spring cover, follow these steps:
- Remove the old spring cover: Start by removing the old spring cover from the trampoline. This will allow you to measure it accurately and determine the appropriate size for the replacement cover.
- Measure the length: Using a tape measure, measure the length of the spring cover. Start from one end of the cover and extend the tape measure along the edge until you reach the other end. Make sure to measure along the outer edge of the cover.
- Note the measurement: Record the measured length of the spring cover in inches or centimeters. This will be the length of the replacement cover you need.
- Measure the width: Measure the width of the spring cover by extending the tape measure from one side to the other side. This measurement should be taken at the widest part of the cover, usually, the portion that covers the springs.
- Note the measurement: Record the measured width of the spring cover in inches or centimeters. This will be the width of the replacement cover you need.
- Measure the skirt length: Some spring covers have a skirt that hangs down over the trampoline frame. If your spring cover has a skirt, you may also want to measure its length. Start from the edge of the cover where it meets the trampoline mat and extend the tape measure down the skirt until you reach the desired length.
- Note the measurement: Record the measured length of the skirt in inches or centimeters if applicable.
- Consider the type and quality: When purchasing a replacement spring cover, consider the type and quality of the cover. Look for a cover made of durable, weather-resistant materials that can withstand outdoor elements and protect the springs.
By following these steps and noting the measurements, you can ensure that you select the correct size replacement spring cover for your trampoline.
It’s always a good idea to double-check the measurements and consult the manufacturer or retailer for guidance to ensure a proper fit and adequate protection for the springs.
Standard trampoline spring size
The standard size of trampoline springs varies depending on the size and type of trampoline. However, most trampoline springs have a length of 7 to 10 inches (18 to 25 centimeters), a coil count of 30 to 96, and a wire gauge of 3.0mm to 5.5mm.
Here are some common trampoline sizes and their corresponding spring lengths:
- 8ft trampoline: 5.5-inch springs
- 10ft trampoline: 7-inch springs
- 12ft trampoline: 7-inch or 8.5-inch springs
- 14ft trampoline: 8.5-inch or 9-inch springs
- 15ft trampoline: 9-inch or 10-inch springs
It’s important to note that the size of the springs can vary between different brands and models of trampolines. Refer to the manufacturer’s specifications or measure your trampoline springs to ensure you purchase the correct size replacements.
Using the wrong size or type of springs can affect the safety and performance of your trampoline, potentially leading to accidents or damage. Always ensure you use compatible springs and follow the manufacturer’s recommendations for maintaining and replacing them.
FAQs
Q.1 How do I accurately measure the length of a trampoline spring?
Measuring the length of a trampoline spring is crucial for finding suitable replacements. To measure the length, start from one end of the spring and measure along the curved body to the opposite end. Ensure the tape measure is straight and not stretched for accurate results.
Q.2 What other measurements should I consider when measuring trampoline springs?
In addition to length, it’s important to consider the coil count and wire gauge. The coil count refers to the number of coils or turns the spring has, while the wire gauge represents the thickness of the spring wire.
These measurements contribute to the performance and compatibility of replacement springs.
Q.3 How can I ensure the correct size when measuring a trampoline spring cover?
To measure a trampoline spring cover, use a tape measure to determine the length and width of the cover. Measure along the outer edge for both dimensions. If applicable, you can also measure the length of any skirt hanging over the trampoline frame.
Q.4 What is the standard size for trampoline springs?
The standard size of trampoline springs varies depending on the trampoline size and type. However, most trampoline springs range from 7 to 10 inches long, have a coil count of 30 to 96, and a wire gauge of 3.0mm to 5.5mm.
It’s essential to refer to the manufacturer’s specifications or measure your specific trampoline springs to ensure proper replacement.
Q.5 How important is it to measure trampoline springs accurately?
Accurate measurement of trampoline springs is crucial for ensuring proper fit, performance, and safety. Incorrectly sized springs can result in an imbalanced bounce, instability, or even damage to the trampoline.
Precise measurements help you select the appropriate replacements and maintain the optimal functioning of your trampoline.
Conclusion
In conclusion, measuring trampoline springs is a crucial task when it comes to maintenance, replacement, and ensuring the safety of your trampoline. This beginner’s guide has provided a comprehensive overview of how to measure trampoline springs accurately and effectively.
Before beginning the measurement process, it’s important to prepare by following safety precautions and gathering the necessary tools and materials. This ensures a smooth and secure measurement experience.
Whether you choose to measure the entire length, the stretched length, or calculate the average length, the step-by-step instructions provided in this guide will help you obtain precise measurements.
Additionally, this guide offers tips and troubleshooting advice to overcome common challenges encountered during spring measurement. It provides valuable insights on handling various types of trampoline springs and troubleshooting solutions for measurement difficulties.
Utilizing the measured spring data is the next step after obtaining accurate measurements. Understanding how to interpret the spring length for replacement, sourcing suitable replacement springs based on the measurements, and ensuring compatibility and safety with new springs are vital considerations to maintain optimal trampoline performance and safety.
Lastly, this guide includes additional information on measuring trampoline spring size, measuring a trampoline spring cover, and the standard sizes of trampoline springs. These details are a handy reference for anyone looking to replace or upgrade their trampoline components.
By following the guidance provided in this guide, both beginners and trampoline enthusiasts can confidently measure their trampoline springs, make informed decisions, and enjoy a safe and enjoyable trampoline experience.
We trust that this comprehensive guide on “How To Measure a Trampoline Spring” has provided you with a thorough understanding of the process.
If you have any further questions or need additional clarification, please don’t hesitate to comment below. Our team is here to assist you and ensure you understand trampoline spring measurements clearly.