If you have a backyard and love outdoor activities, a trampoline can be an exciting addition to your home. A trampoline provides hours of fun and exercise for both children and adults.
However, setting up a trampoline in your backyard can be challenging, especially if you have limited space or safety concerns. One option to address these concerns is to install a trampoline in the ground.
Putting a trampoline in the ground can have numerous benefits, such as reducing the risk of injuries, preserving the view of your backyard, and providing easy access for children and adults.
However, it is essential to consider several factors, such as the size of the trampoline, soil conditions, and safety precautions.
This installation method requires careful planning, preparation, and execution to ensure a safe and successful outcome.
We will discuss step-by-step instructions on how to put a trampoline in the ground, including the necessary tools, safety measures, and tips for a smooth installation process.
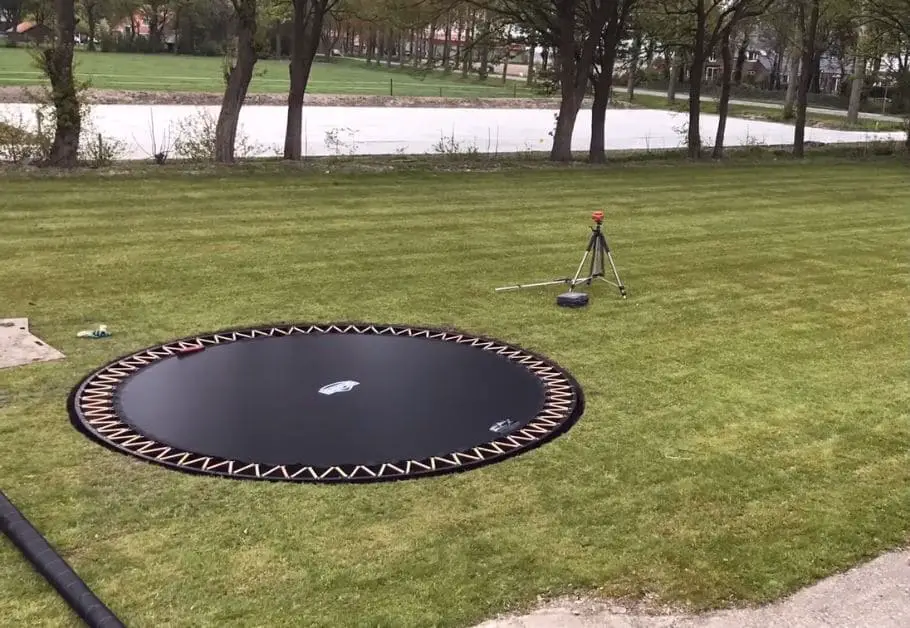
How to put a trampoline in the ground: To put a trampoline in the ground, you will need to dig a hole that is the same diameter as the trampoline and about 2-3 feet deep. The hole should be level and have a sturdy base. After placing the trampoline in the hole, make sure it is level and fill in the gaps with dirt. Secure the trampoline to the ground with anchors or stakes to prevent it from moving or tipping over.
How to put a trampoline in the ground?
Putting a trampoline on the ground can be a fun and safe way to enjoy this outdoor activity. The first step is to choose a suitable location where the ground is level and clear of any debris or sharp objects.
Then, you will need to dig a hole that is slightly larger than the diameter of your trampoline and deep enough to accommodate the trampoline’s frame. You can use a level to ensure the hole is even and then fill the bottom with a layer of gravel for drainage.
Next, you can assemble the trampoline and place it in the hole, making sure it is level and stable. Finally, you can fill the gap between the trampoline and the hole with soil or mulch, creating a smooth and safe surface for jumping.
By following these steps, you can enjoy a trampoline that is flush with the ground, providing a safe and fun outdoor activity for all ages.
Choosing the Right Location
When it comes to installing an in-ground trampoline, choosing the right location is critical to ensure both safety and functionality. There are several factors to consider when selecting the best location for your trampoline, including safety considerations, space requirements, and soil type.
Safety considerations
Safety should be the top priority when selecting the location for your in-ground trampoline. The area should be free of potential hazards such as tree branches, rocks, and sharp objects.
Ideally, the trampoline should be located away from any structures or obstacles that a jumper could collide with if they accidentally bounce off the trampoline.
You should also consider the safety of the surrounding area. If you have small children or pets, you may want to choose a location that is visible from inside your home, allowing you to keep an eye on the jumpers while they play.
It is also essential to ensure that the trampoline is not located near a pool or other water feature that could pose a drowning risk.
Another safety consideration is the ground around the trampoline. The area should be free of any tripping hazards, and the ground should be level and stable.
If the area is sloped, you may need to level the ground before installation to prevent the trampoline from becoming unbalanced.
Space requirements
The space requirements for an in-ground trampoline will depend on the size of the trampoline and the number of jumpers who will be using it. It is essential to choose a location that provides enough space for safe and comfortable jumping.
The trampoline should be located in an area that is at least 10 feet away from any structure, fence, or other obstacle. This will provide enough clearance for jumpers to safely bounce on the trampoline without hitting anything.
You should also consider the size of the trampoline when choosing the location. Most in-ground trampolines come in standard sizes of 12 feet, 14 feet, and 15 feet in diameter.
You should choose a location that provides enough space for the trampoline and allows for safe and comfortable jumping.
You should also consider the height of the jumpers when selecting the location. If you have taller jumpers, you may need to choose a location with a higher clearance.
Soil type
The soil type in your yard can also play a significant role in choosing the right location for your in-ground trampoline. The soil should be stable and level to provide a safe and sturdy base for the trampoline.
If the soil is sandy or loose, you may need to reinforce the area around the trampoline with concrete or other materials to provide a stable base. If the soil is rocky, you may need to remove any rocks or boulders from the area before installation.
It is also important to consider the drainage in the area. If the soil is prone to pooling water or flooding, it may not be the best location for an in-ground trampoline. Standing water around the trampoline can create a slipping hazard, making it unsafe for jumpers.
Pre-Installation Preparation
Proper pre-installation preparation is crucial when it comes to installing an in-ground trampoline. This process involves several steps, including gathering the necessary tools and materials, removing obstacles from the installation area, and marking out the location of the trampoline.
Gathering necessary tools and materials
Before starting the installation process, it is essential to gather all the necessary tools and materials. The tools required will depend on the type of in-ground trampoline you have and the manufacturer’s instructions.
However, some of the common tools needed for installation include a shovel, level, measuring tape, wheelbarrow, and concrete mixing tools.
In addition to tools, you will also need to have the necessary materials on hand. This may include concrete, retaining wall blocks, and drainage systems. It is essential to review the manufacturer’s instructions carefully to ensure you have all the necessary tools and materials for installation.
Removing obstacles
Once you have gathered all the necessary tools and materials, the next step is to remove any obstacles from the installation area. This may include rocks, tree roots, or any other debris that could interfere with the installation process.
It is important to take your time during this step to ensure that the area is clear of all obstacles. Even small rocks or roots can cause problems during installation, so it is essential to be thorough.
Marking out the area
After clearing the installation area of any obstacles, the next step is to mark out the location of the trampoline. This involves using a measuring tape to measure the diameter of the trampoline and marking the perimeter of the installation area with spray paint or stakes.
It is important to make sure that the marked-out area is level and square. This will ensure that the trampoline is installed correctly and will be safe for use. You may need to use a level or a string line to ensure that the marked-out area is level and square.
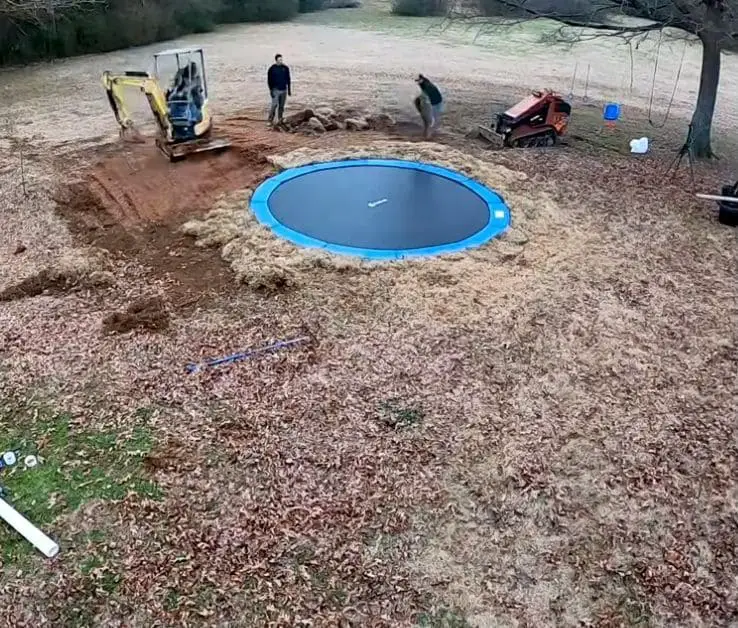
Once the area is marked out, you can begin the excavation process. This involves digging a hole that is deep enough to accommodate the trampoline frame and allows for proper drainage. The depth of the hole will depend on the size of the trampoline and the manufacturer’s instructions.
In addition to the excavation process, you may also need to create a retaining wall around the perimeter of the installation area. This will help to keep the soil in place and prevent erosion around the trampoline.
Excavation and Groundwork
Excavation and groundwork are important steps in the installation process of an in-ground trampoline. Proper excavation and ground preparation will ensure that the trampoline is installed safely and securely.
This process involves several steps, including digging the hole, creating a retaining wall, and leveling the ground.
Digging the hole
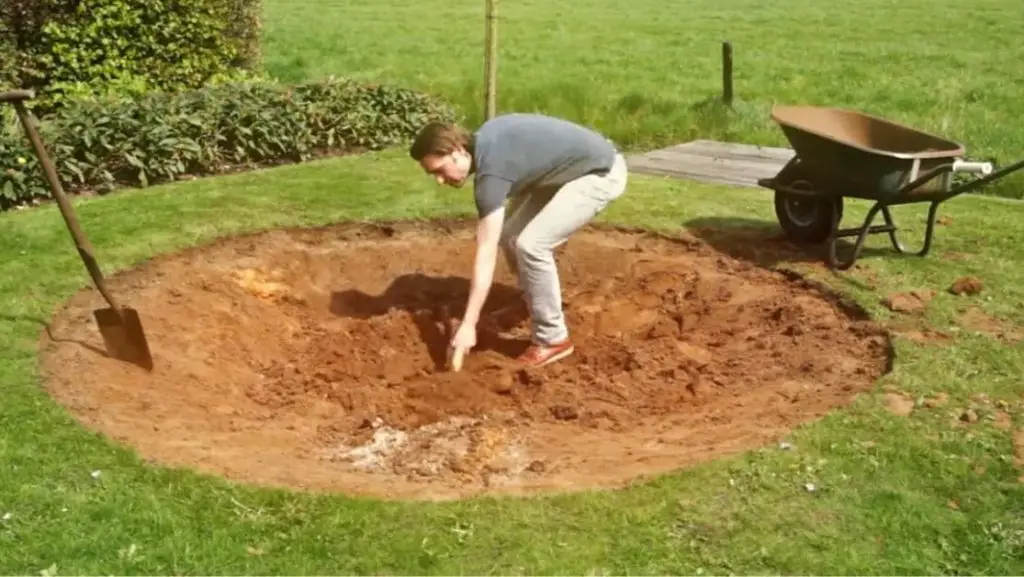
The first step in excavation and groundwork is digging the hole for the trampoline. The size of the hole will depend on the size of the trampoline and the manufacturer’s instructions. It is important to dig the hole to the proper depth and width to ensure that the trampoline fits securely.
When digging the hole, it is important to take into consideration the type of soil in the area. If the soil is rocky or hard, it may be necessary to use a pickaxe or other heavy-duty digging tools.
On the other hand, if the soil is sandy or loose, it may be easier to dig but may require additional measures to ensure stability.
It is important to ensure that the hole is dug evenly and is the same depth throughout. This will ensure that the trampoline is level and safe for use.
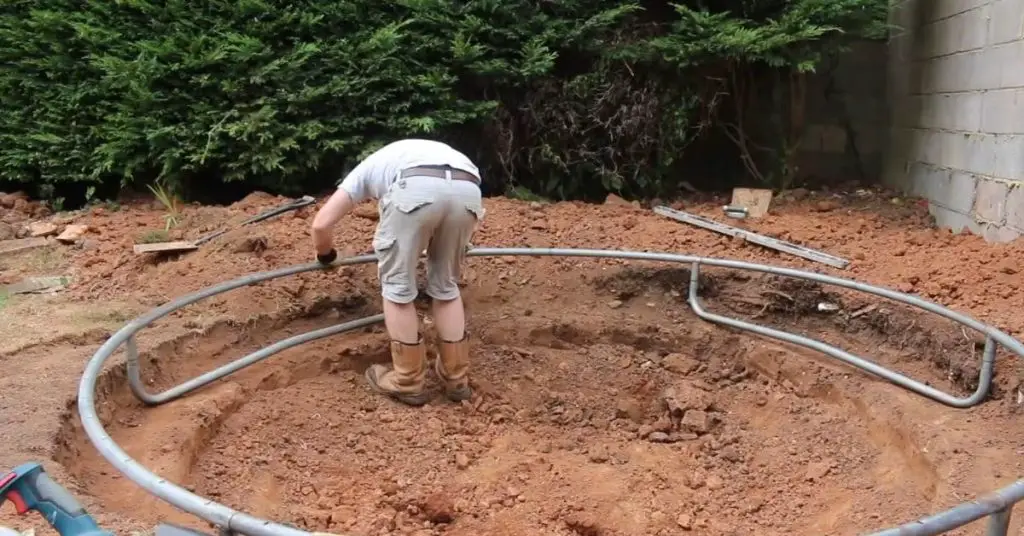
Creating a retaining wall
After digging the hole, the next step is to create a retaining wall around the perimeter of the installation area. This will help to keep the soil in place and prevent erosion around the trampoline. The retaining wall will depend on the manufacturer’s instructions and the type of soil in the area.
Some common types of retaining walls include cinder blocks, bricks, or timber. It is important to follow the manufacturer’s instructions carefully to ensure that the retaining wall is constructed correctly.
Leveling the ground
The final step in excavation and groundwork is leveling the ground. This involves ensuring that the hole is level and even and that the retaining wall is properly installed.
To level the ground, you may need to use a level or a string line to ensure that the hole is even throughout. It is important to take your time during this step to ensure that the trampoline is installed safely and securely.
In addition to leveling the ground, you may also need to add drainage to the installation area. This will help to prevent water from collecting around the trampoline and causing damage over time.
Installing the Trampoline
Installing an in-ground trampoline is a fun and rewarding project that can provide endless hours of entertainment for your family and friends. The final step in the installation process involves assembling the trampoline, placing it in the hole, and securing it in place.
In this section, we will discuss each of these steps in more detail.
Assembling the trampoline
The first step in installing an in-ground trampoline is to assemble the trampoline itself. Follow the manufacturer’s instructions carefully to ensure that the trampoline is assembled correctly.
Most in-ground trampolines come with a frame, springs, mat, and safety padding. Assemble the frame and attach the springs to the frame according to the manufacturer’s instructions. Then, lay the mat over the springs and attach it to the frame.
Finally, install the safety padding around the edges of the trampoline to protect users from the springs and frame.
Placing the trampoline in the hole
Once the trampoline is assembled, it’s time to place it in the hole. This can be a challenging step, as the trampoline can be heavy and difficult to maneuver. Enlist the help of friends or family members to assist with this step.
Start by lifting the trampoline and lowering it into the hole. Make sure that the trampoline is centered in the hole and that the frame is level. It’s important to take your time during this step to ensure that the trampoline is placed correctly.
Securing the trampoline in place
The final step in the installation process is to secure the trampoline in place. This is an important step to ensure that the trampoline is safe and will not move during use.
Most in-ground trampolines come with anchoring systems to secure them in place. Follow the manufacturer’s instructions carefully to ensure that the trampoline is anchored correctly.
Common anchoring systems include stakes, bolts, or straps. These systems will help to keep the trampoline in place during use and prevent it from moving or tipping over. It’s important to ensure that the anchoring system is tight and secure to prevent any accidents or injuries.
It’s also important to regularly inspect the anchoring system to ensure that it is still secure and tight. Over time, the ground may shift or settle, which can cause the trampoline to become loose. Regular inspections will help to ensure that the trampoline is still safe and secure.
Post Installation Care
After installing your in-ground trampoline, it’s important to take proper care of it to ensure that it lasts for years to come and that it remains safe for users.
In this section, we will discuss post-installation care, including adding safety features, maintenance requirements, and regular safety checks.
Adding safety features
Even after installing your in-ground trampoline, you may want to consider adding additional safety features to protect users. Some popular safety features include:
Netting: Adding a net around the trampoline can prevent users from falling off the trampoline and potentially getting injured. Netting can also prevent objects from getting under the trampoline and causing damage.
Ladder: Installing a ladder can make it easier for users to get on and off the trampoline safely. This is especially important for young children who may have trouble getting on and off the trampoline on their own.
Cover: Adding a cover can protect the trampoline from weather damage and prevent debris from getting inside the trampoline.
Adding safety features can provide additional protection for users and help to prevent accidents and injuries.
Maintenance requirements
Like any outdoor equipment, in-ground trampolines require regular maintenance to ensure that they are functioning properly and safely. Here are some maintenance requirements to keep in mind:
Cleaning: Regularly clean the trampoline mat and padding with a mild soap and water solution. This will help to remove dirt, debris, and sweat that can accumulate on the trampoline and make it slippery.
Lubrication: Lubricate the springs and frame with a silicone-based lubricant to prevent rust and ensure that the trampoline is functioning properly.
Inspection: Regularly inspect the trampoline for any signs of damage or wear and tear. Look for holes or tears in the mat or padding, loose springs or bolts, or any other signs of damage.
By performing regular maintenance, you can ensure that your in-ground trampoline is functioning properly and remains safe for users.
Regular safety checks
In addition to regular maintenance, it’s important to perform regular safety checks on your in-ground trampoline. Here are some things to keep in mind:
Check the anchoring system: Regularly inspect the anchoring system to ensure that it is still secure and tight. Over time, the ground may shift or settle, which can cause the trampoline to become loose. Regular inspections will help to ensure that the trampoline is still safe and secure.
Check the padding: Make sure that the safety padding is still in place and has not become loose or shifted. This will help to protect users from the springs and frame.
Check for debris: Regularly check for debris, such as leaves or branches, that may have gotten under the trampoline. This can cause damage to the trampoline or potentially cause injury to users.
Performing regular safety checks can help to ensure that your in-ground trampoline is still safe and secure for users.
FAQs
Q.1 Why would I want to put a trampoline in the ground?
Putting a trampoline in the ground can offer a safer and more aesthetically pleasing alternative to traditional above-ground trampolines. It can also minimize the risk of injury from falls.
Q.2 What tools do I need to put a trampoline on the ground?
You will need a shovel, a level, a tape measure, a hammer, a saw, and some landscape fabric. Depending on the type of trampoline you have, you may also need a drill, screws, and anchors.
Q.3 What kind of ground is suitable for putting a trampoline in the ground?
The ground should be level and free of rocks, roots, or other debris that could cause injury. It’s also important to choose a location that is away from trees, fences, or other objects that could pose a risk.
Q.4 How deep should I dig the hole for the trampoline?
The hole should be slightly larger than the diameter of the trampoline and deep enough to accommodate the trampoline’s frame. This typically ranges from 2 to 3 feet deep, depending on the size of the trampoline.
Q.5 How do I secure the trampoline in the ground?
You can use screws and anchors to secure the trampoline to the ground. Alternatively, you can fill the gap between the trampoline and the hole with soil or mulch, creating a smooth and safe surface for jumping.
Q.6 Is putting a trampoline on the ground difficult?
Putting a trampoline on the ground can be a challenging task that requires some physical labor and a few specialized tools. However, with some planning and patience, it can be a fun and rewarding DIY project for homeowners who are up for the challenge.
Q.7 Can I put any type of trampoline in the ground?
Not all trampolines are suitable for in-ground installation. Be sure to check with the manufacturer or retailer to ensure the trampoline you have or plan to purchase is designed for in-ground use.
Conclusion
In conclusion, putting a trampoline on the ground can be a fun and safe way to enjoy this popular outdoor activity. It requires careful planning and preparation to ensure that it is done correctly and safely.
Choosing the right location, considering safety factors, and preparing the site are important steps in the process.
Excavating the hole, creating a retaining wall, and leveling the ground are critical steps to ensuring a stable and level surface for the trampoline. Installing the trampoline requires careful assembly, placement in the hole, and securing it in place.
After installation, adding safety features, performing regular maintenance, and safety checks are necessary to ensure that the trampoline remains safe and fun for everyone to use.
By following these steps, you can create a safe and enjoyable in-ground trampoline that will provide hours of outdoor fun for your family and friends.
After reading this complete guide on how to put a trampoline in the ground, we hope that you now understand how to do it safely and correctly. If you still have any questions, please don’t hesitate to leave a comment below, and we will do our best to answer them for you.